Table Of Content

Those without a strong sweet tooth will appreciate this house. Decorated with almonds, macadamias and walnuts, this gingerbread residence is packed with protein. Place both pieces of the roof on top where they go and gently press into place. Let the house dry for at least 30 minutes before decorating. Pipe a thick layer of icing on the bottom of the other end other house and place it against the wall you just sat down. Pipe a thick line of icing on three sides (two short and one long side) of a side wall piece of the house.
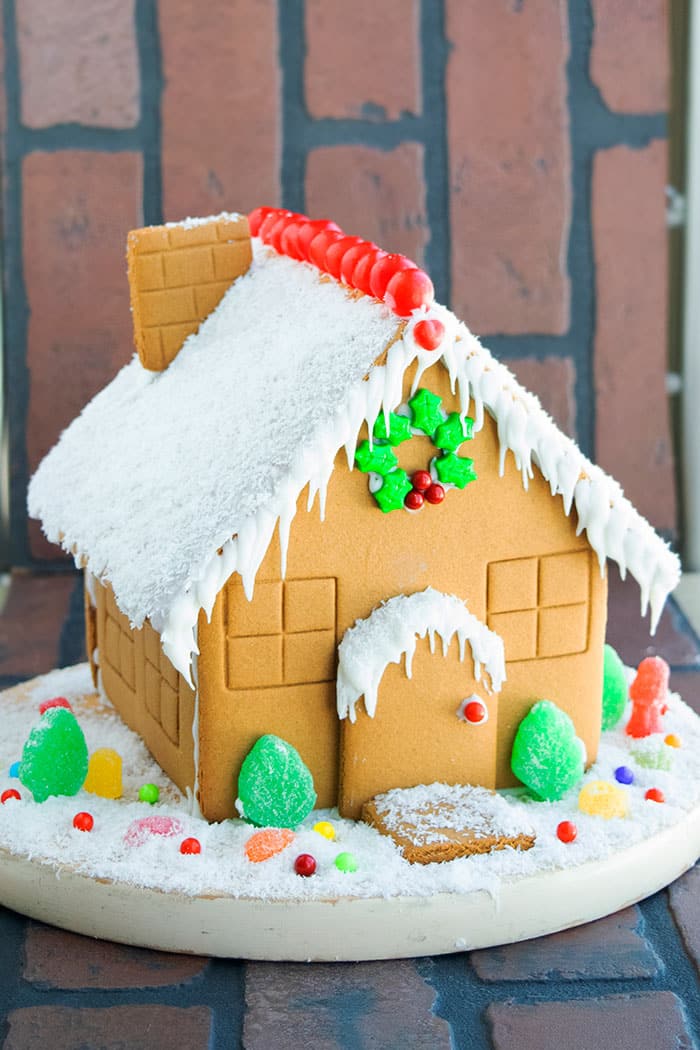
Icing/Assembly
Keep it at least 1/4" thick for strong walls. Lightly flour the surface of the dough and place your cutters or pattern pieces about 1" apart. Cut out all the shapes, then remove the excess dough between your pieces. By removing the excess rather than moving your cut pieces, you will avoid distorting the shapes, which can affect how well they’ll fit together.

Let us Know if You Make this Gingerbread House Recipe
Finish with a thick line of icing along the top where the roof panels meet. Allow the icing to fully set in a dry place before adding decorations. This could take a few hours, or overnight. If you’re decorating with kids, it helps to assemble the houses the day before, so they are fully stable and ready to pile on the candy.
Gingerbread Dough and Gingerbread House Recipe
Seal the opening of the piping bag or ziploc bag, making sure to remove as much air as possible. Exposure to air will cause the royal icing to harden. Mix until you get a smooth, thick royal icing mixture (Image 34). The correct consistency should be spreadable but stiff, so that the royal icing will not “run” or spread, but still easily pipeable (Image 35). If there are any edges that are not straight, don’t worry! You can use royal icing to fill and straighten the edges, or you can use a micro planer to carefully shave off excess cookie on the sides (Image 28).
Videos
It wasn't always pretty, but we always had fun decorating the house together. This gingerbread house turns out so darling and are fun to create. They are made with a sturdy dough that is great for construction and tastes amazing too. Plus, I have even included TWO free printable pattern that is easy to follow. This post is everything that you need to know on how to make a gingerbread house and I’m here for support and troubleshooting if you need it. I’m including templates (in the recipe card) to make either 1 larger gingerbread house (which I demonstrate in the video) or two smaller houses (shown above).
Rate This Recipe
In addition, if you want to keep your house for as long as possible, you’ll want a frosting that’s devoid of any butter, as this can cause it to rot faster. Although families around the world make them now, gingerbread houses first began in Germany in the 16th century. Keep your gingerbread house in a tightly closed container as long as it’s out on your counter or in your pantry.
It was the first time I had ever decorated a real gingerbread house and I was put in charge of making the royal icing to act as the cement glue for the houses. There are a few things you can do to make sure your gingerbread house is nice and sturdy. First, roll your dough to the proper thickness (I recommend ¼” thick — too thin and the sides may not hold up to the weight of the roof. ). Next, make sure to wait until your gingerbread has cooled completely before attempting to assemble it. Using the proper icing (in this case, royal icing) will make a huge difference in how secure your gingerbread house is, since the icing is the glue that holds it together. I’ve had success with decorating mine right away, but do what works best for you.
My Favorite Carrot Cake Recipe
Bake and when ready, cut through the soft gingerbread along the scored lines with a sharp knife before it hardens.Don’t wait until the gingerbread is hard as it will crack easily. Doing this method is better than cutting the dough to the exact template as you will prevent the edges from spreading. These houses took several gatherings, one to make the dough and the pattern pieces, one to roll out the dough and bake the pieces, one to assemble the pieces, one to decorate.
Cringe-Worthy Gingerbread House Fails - Business Insider
Cringe-Worthy Gingerbread House Fails.
Posted: Thu, 15 Nov 2018 08:00:00 GMT [source]
For the Icing
The icing is set when the pieces hold steady without sliding apart. You should now have all four walls assembled. To the modern cook, making a gingerbread house may seem nearly as daunting as building a real house. But, like dyeing Easter eggs, it’s a rewarding, hands-on way to connect to holiday traditions of the past. Stretched over a few winter evenings or a weekend, it’s a festive effort — especially with a group.
The same group is seen in several videos and pictures of the thieves posted online. The group of burglars is seen fleeing the scene in a white Honda SUV in the security footage. The only thing explosive about these cake bombs is the delicious taste of gingerbread cake beneath the icing shell.
That means that everything inside the kit, from the gingerbread itself to the candy and icing, is safe to consume. This guide will help you build a festive cookie house like a pro! It’s a holiday tradition for us to bake and decorate gingerbread houses, and we use this recipe yearly.
These awesome Gingerbread Pop-Out Cutters simplify the design process in a snap. Just roll your dough, cut out two of each shape, imprint the design, and bake — you’ll have a sweet house that fits together perfectly, no math required! The right tools will make your construction project go much more smoothly. You’ll need a few baking basics like a rolling pin, parchment paper, a thin spatula, a sharp knife, and piping bags. You’ll also need an electric mixer for the royal icing.


No comments:
Post a Comment